Eltako EUD12NPN

$28.99

Description

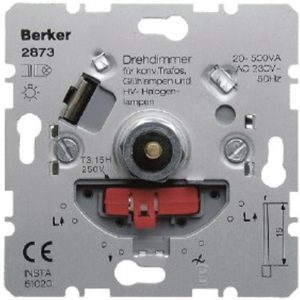
Dimmer, Universal Dimmer, Led, Halogen, Incandescent, Rotating, Blue

Eltako EUD12NPN properties

Product nameEUD12NPN
TypeDimmer
DimmerUniversal Dimmer
Suitable for lamp typeHalogen, Incandescent, Led
Rotating or TouchRotating
Memory FunctionYes
Voltage230 V
ColourBlue

Additional information

Product name

Product type

Dimmer

Suitable for lamp type

, ,

Rotating or Touch

Memory Function

Voltage

Colour

Reviews

There are no reviews yet.

Be the first to review “Eltako EUD12NPN”

Your email address will not be published. Required fields are marked *

Frequently Asked Questions:

What type of electrical accessory is the Eltako EUD12NPN and how does it function within an electrical system?

The Eltako EUD12NPN is a 12-volt DC power supply with a built-in surge arrester. It functions as an alternative source of electricity in case of mains failure, providing backup power to electrical devices that operate on low voltage direct current (LVDC). The Eltako EUD12NPN can also be used for temporary or remote power supply applications where there is no access to the mains. Its function within an electrical system is to provide reliable and continuous power to critical equipment, preventing disruption and ensuring smooth operation even during power outages.

How do I properly connect an Eltako EUD12NPN switch to a 230V circuit, ensuring that it is wired correctly for both single and three-phase power supply options?

To properly connect an Eltako EUD12NPN switch to a 230V circuit for both single and three-phase power supply options, follow these steps:

1. First, you need to determine whether the power supply is single-phase or three-phase. This will help you select the appropriate terminal block for connection. Eltako provides separate terminal blocks for single-phase (TPS) and three-phase (TTP) power supplies. Next, connect the input terminals of the switch to the power supply circuit. Here's how:

a) For a single-phase power supply, connect the incoming live (L1) wire to terminal 1 on the TPS terminal block. Connect the neutral (N) wire to terminal 2 and the earth (PE) wire to terminal 3. Ensure that the wires are securely connected and tightened using the screws provided. For a three-phase power supply, connect each phase wire (L1, L2, L3) to their respective terminals (TP1, TP2, TP3) on the TTP terminal block. Connect the neutral (N) wire to terminal 4 and the earth (PE) wire to terminal 5. Make sure that the wires are secured and tightened using screws. Finally, connect the output terminals of the switch to the load circuit. This is where you'll attach the devices or appliances that will be controlled by the switch. Here's how:

a) For a single-phase power supply, connect the outgoing live (L1) wire from the switch to terminal 1 on the TPS terminal block for output. Connect the neutral (N) wire to terminal 2 and the earth (PE) wire to terminal 3. Ensure that the wires are secured and tightened using screws. For a three-phase power supply, connect each phase wire from the switch to their respective terminals (TP1, TP2, TP3) on the TTP terminal block for output. Connect the neutral (N) wire to terminal 4 and the earth (PE) wire to terminal 5. Again, make sure that the wires are secured and tightened using screws. Remember to always follow the manufacturer's instructions and safety guidelines when working with electrical devices or circuits. If you're unsure about any step in the process, it may be best to consult a professional electrician for assistance.

How do I properly wire and connect an Eltako EUD12NPN dimmer switch to a single-pole light switch circuit with no neutral wire present?

To wire and connect an Eltako EUD12NPN dimmer switch to a single-pole light switch circuit without a neutral wire, follow these steps:

1. Turn off power to the circuit by switching off the circuit breaker or removing the fuse. Remove the existing light switch cover plate and disconnect the wires connected to the old switch. Connect the black (line) wire from the circuit to the terminal labeled L1 on the EUD12NPN dimmer switch. Connect the white (switched live) wire from the circuit to the terminal labeled SW on the EUD12NPN dimmer switch. Connect a jumper wire between the terminals labeled L1 and SW on the EUD12NPN dimmer switch. This is necessary because there is no neutral wire in this setup. Securely mount the Eltako EUD12NPN dimmer switch onto the electrical box using the provided screws. Connect the wires from the existing light fixture to the terminals labeled T1 and T2 on the EUD12NPN dimmer switch according to the polarity of the fixture's wiring. Attach the cover plate back onto the electrical box. Restore power to the circuit by switching on the circuit breaker or replacing the fuse. Test the operation of the Eltako EUD12NPN dimmer switch and light fixture by turning the dimmer knob to adjust the brightness level.

How do I connect multiple devices using the Eltako EUD12NPN unit?

To connect multiple devices using the Eltako EUD12NPN unit, you will need to follow these steps:

1. Ensure that all devices you wish to connect are compatible with RS-485 protocol. The Eltako EUD12NPN supports RS-485 communication, making it ideal for connecting multiple devices that also adhere to this standard. Connect the devices to the Eltako EUD12NPN unit using RS-485 cables. You can connect up to 32 devices via this interface. Be sure to observe proper cabling protocols and ensure that each device is connected to a unique address on the bus. Power on the Eltako EUD12NPN unit and navigate to its configuration menu using the front panel or remote software tool. In the configuration menu, select the RS-485 port you want to use for device communication. Configure the communication settings such as baud rate, data bits, parity, and stop bits according to the specifications of your connected devices. It is essential that these settings match across all devices on the bus to ensure reliable communication. Save the configuration and exit the menu. Your Eltako EUD12NPN unit is now configured to communicate with multiple devices via RS-485 protocol. You can monitor device activity through the front panel displays or remote software tool as needed.