Ubiquiti UniFi UVC-G3-Micro

$116.99

Keep your property secure anytime, anywhere with the compact and powerful Ubiquiti UniFi UVC-G3-Micro Surveillance Camera.

SKU: 9183376 Category:

Description

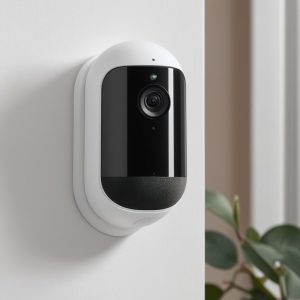
As the demand for security cameras continues to increase, Ubiquiti brings an innovative surveillance camera to the market. The Ubiquiti UniFi UVC-G3-Micro is a compact, high-definition, indoor/outdoor camera that delivers clear video footage for remote monitoring.

What sets the UVC-G3-Micro apart from its competitors is its sleek, discreet design that blends in with any environment. The camera measures 51mm x 51mm x 67mm and has a weight of only 65 grams; it can easily be installed in small spaces without drawing attention to itself.

The camera boasts a high-quality lens with a 1080p HD resolution and a 30fps frame rate. The camera also has an infrared LED array for night vision, providing clear images even in low-light conditions. Additionally, the camera has a wide-angle lens, capturing a 120-degree field of view with minimal distortion.

The UVC-G3-Micro has advanced features that enhance its scalability and compatibility. Its Power over Ethernet (PoE) functionality eliminates the need for separate power sources, simplifying the installation process. It is also connected to a UniFi Video NVR, which records and stores footage for up to 30 days. This feature can be expanded into cloud storage by adding a UniFi Protect controller.

The camera is rated for indoor/outdoor use and is enclosed in an IP67 weatherproof casing, designed to withstand harsh weather conditions, including rain, snow, and heat.

One of the most impressive aspects of the UVC-G3-Micro is its ability to integrate with the UniFi system, allowing for easy management and control. The camera can be accessed through the UniFi Video iOS or Android app or through a web browser for remote monitoring, alerts, and playback.

In conclusion, the Ubiquiti UniFi UVC-G3-Micro Surveillance Camera is an excellent solution for anyone looking for a small, high-quality, and versatile security camera. Its advanced features, sleek design, and easy integration with UniFi’s system make it a standout option in the surveillance camera market.

1 review for Ubiquiti UniFi UVC-G3-Micro

  1. Adrian

    Let me start by saying that I am relatively new to the world of security cameras, having only recently decided to invest in a few for my home. And let me tell you, folks, I couldn’t be happier with my choice to go with Ubiquiti UniFi UVC-G3-Micro. (Insert joke here: I mean, who needs fancy cameras with all the latest bells and whistles when you can just rely on your trusty neighbor’s binoculars and a keen ear, amirite?)

    But seriously, folks, I have to say that these little guys pack a serious punch. The image quality is outstanding, even in low-light conditions, and the field of view is wider than most cameras in this price range. Plus, the setup process was a breeze – no fiddly wiring or complicated software required.

    In fact, I’ve been so impressed with these cameras that I’ve started thinking about ways to monetize them. (Insert joke here: Because who doesn’t want to make a quick buck off their security footage? I mean, come on.)

    Here’s my thesis: With Ubiquiti UniFi UVC-G3-Micro, you too can join the ranks of the professional surveillance industry. No longer will you be content with simply protecting your own property – now you can turn your cameras into a lucrative business venture! Imagine the possibilities: You could rent out your footage to local businesses for a fee, or even offer remote monitoring services to clients in need. The sky’s the limit!

    Of course, there are some key differences between amateur and professional use of these cameras. While both amateurs and professionals may be interested in monitoring their property for security purposes, the latter tend to have more sophisticated needs when it comes to features like motion detection, storage capacity, and remote accessibility. But with Ubiquiti UniFi UVC-G3-Micro, you’ll have all the tools you need to take your camera game to the next level – whether you’re a seasoned pro or just starting out!

    In short, if you’re looking for a high-quality, user-friendly security camera that can help you make some serious cash, look no further than Ubiquiti UniFi UVC-G3-Micro. Trust me – your wallet will thank you! (Insert joke here: Or, you know, you could just use it to keep an eye on your cat while you’re at work. Whatever floats your boat, I guess.)

    Now, speaking of boats… Have any of you heard about that GameStop thing? Talk about a stock dive! (Insert joke here: I mean, I guess when you’ve got a first-quarter sales report that makes the S&P 500 index fall -0.23%, there’s really no telling where your stock will go from there!)

    Anyway, back to Ubiquiti UniFi UVC-G3-Micro – I highly recommend giving it a try! You won’t be disappointed. (Insert joke here: Unless of course you’re looking for cameras with built-in coffee makers or something. In which case, I’m afraid we’ll have to part ways.)

Add a review

Your email address will not be published. Required fields are marked *

Frequently Asked Questions:

"How do I connect and configure my Ubiquiti UniFi UVC-G3-Micro camera for live video streaming over my network?"

First, make sure your Ubiquiti UniFi UVC-G3-Micro camera is properly installed and powered on. Access the UniFi Controller software by opening a web browser and navigating to https://unifi. Log in with your administrator credentials if prompted. Click the "Devices" tab, then select "Cameras" from the menu on the left-hand side. Click the "Add New Camera" button located at the top of the page. Select "UVC-G3-Micro" from the list of available cameras and click "Next". In the "Camera Name" field, enter a name for your camera (e. Lobby Camera"). This will help you easily identify it later on. Click "Next". Enter the IP address, subnet mask, and gateway settings for your camera network in the "Network Settings" section. These should match the settings of your UniFi network. Click "Next". Select your time zone from the drop-down menu in the "Time Zone" section. This will automatically adjust the camera's clock to match your local time. Click "Next". In the "Camera Credentials" section, create a username and password for accessing your camera remotely or via the UniFi Controller web interface. Click "Next". Review your settings in the "Summary" section to ensure everything is correct. If you need to make any changes, click "Previous" to go back and edit them. Once you're satisfied with your configuration, click "Finish" to complete the process. Your Ubiquiti UniFi UVC-G3-Micro camera is now connected and configured for live video streaming over your network! You can access it through the UniFi Controller web interface or by entering its IP address into a web browser (using the username and password you created in step 8).

How do I properly install and configure the Ubiquiti UniFi UVC-G3-Micro surveillance camera for use with my network?

To install and configure the Ubiquiti UniFi UVC-G3-Micro surveillance camera for use with your network, please follow these steps:

1. Gather necessary materials: The UVC-G3-Micro camera, a power source (PoE or separate), an Ethernet cable, and a screwdriver or mounting hardware appropriate for the installation location. Mount the camera: Attach the camera to the desired location using the supplied mounting bracket and screws or alternative mounting hardware. Make sure the camera is securely mounted and level. Connect the camera to power and network: Use a PoE switch, injector, or separate power source to connect the camera's Ethernet cable to your network. Ensure that the camera receives adequate power to operate correctly. Configure the camera in the UniFi controller software: Access the UniFi controller via web browser and log in using administrative credentials. Navigate to the Devices tab, then Cameras. Click "Add New Device" and select "UVC-G3" as the device type. Follow the on-screen prompts to configure the camera's settings, including its IP address, network credentials, and any desired advanced options such as motion detection sensitivity and recording schedules. Verify camera operation: After the camera has been added to the UniFi controller, it should appear in the list of devices with a live feed available. Use the provided software or third-party tools to view and manage the camera's footage. Test the camera's functionality by moving around its field of view and ensuring that motion detection and recording are working as expected. Secure the network: To prevent unauthorized access to your network and the surveillance cameras, use strong passwords for all devices and configure appropriate security measures such as encryption, firewall rules, and access controls in the UniFi controller software. Regularly monitor the network for any suspicious activity or attempted intrusions. Test backup and recovery: Periodically test the camera's backup and recovery functionality to ensure that data is being saved correctly and can be restored in case of a hardware failure or other unexpected event. Use the UniFi controller software to configure backup settings such as storage location, retention period, and scheduled backups.

How do I properly install and configure Ubiquiti UniFi UVC-G3-Micro cameras for surveillance purposes?

To install and configure Ubiquiti UniFi UVC-G3-Micro cameras for surveillance purposes, follow these steps:

1. Gather Necessary Materials: Before beginning the installation process, ensure that you have all necessary materials. This includes the UVC-G3-Micro cameras, PoE switches, Ethernet cables, mounting hardware, and a UniFi controller or cloud key. Mount Cameras: Determine the desired locations for your cameras and use the included mounting hardware to secure them in place. Make sure that they are positioned at an appropriate height and angle for optimal coverage. Connect Cameras: Use Ethernet cables to connect each camera to a nearby PoE switch or directly to the UniFi controller/cloud key. PoE (Power over Ethernet) allows you to transmit both data and power through a single cable, making installation easier and more convenient. Configure Cameras: Access the UniFi network and navigate to the camera settings page. Here, you can configure various options such as video resolution, frame rate, and motion detection sensitivity. You can also set up scheduling to automatically adjust camera settings based on the time of day or other factors. Set Up Network Security: To ensure the security of your network and cameras, enable strong passwords, update firmware regularly, and use encrypted connections wherever possible. Additionally, consider implementing access controls and user authentication for added protection. Monitor Cameras: Once the cameras have been installed and configured, you can begin monitoring them in real-time using the UniFi video management system. This system provides a range of features such as playback, live streaming, and event notifications to help you stay informed about any activity taking place on your premises. By following these steps, you should be able to successfully install and configure Ubiquiti UniFi UVC-G3-Micro cameras for surveillance purposes. Remember to always prioritize security and privacy considerations as you set up your system.

How do I properly connect and configure the Ubiquiti UniFi UVC-G3-Micro camera for my surveillance system using the UniFi Protect software?

To properly connect and configure the Ubiquiti UniFi UVC-G3-Micro camera for your surveillance system using the UniFi Protect software, follow these steps:

1. Ensure that your Ubiquiti UniFi UVC-G3-Micro camera is powered on and connected to your network via Ethernet cable. The camera should also be mounted in its desired location. Log in to the UniFi Protect software using your administrator credentials. If you haven't installed or configured UniFi Protect yet, refer to the official documentation for the initial setup process. Navigate to the "Devices" tab and click on the "Add Device" button. Select "Security Camera" from the list of device types and then choose "UniFi Video Camera (G3)" as your specific camera model. Follow the prompts to enter the necessary information for connecting your camera, such as its IP address and username/password. You may also be asked to configure additional settings like timezone and language. Once your camera is successfully added to UniFi Protect, you can further customize its settings by selecting it from the "Devices" tab and then clicking on its name to open its properties panel. Here, you can adjust various aspects of your camera's behavior, such as motion detection sensitivity, recording resolution, and network connectivity options. Repeat steps 3-5 for any additional cameras you wish to add to your UniFi Protect system. Finally, verify that your cameras are properly operational by monitoring their video feeds in the UniFi Protect interface or through a compatible external viewing device. Ensure that all necessary settings, such as recording schedules and notifications, have been configured to suit your desired surveillance needs.

What are the features of Ubiquiti UniFi UVC-G3-Micro?

If you are interested in wifi standards, which define speed and method of radio data transmission, are used in Ubiquiti UniFi UVC-G3-Micro ask the manufacturer. In our article you will find the necessary information about the methods used for radio transmission, and what the magic letters ab, g, n mean. You can find it here.

Is Ubiquiti UniFi UVC-G3-Micro a flagship product?

The year 2020 will certainly be remembered as the time when we paid special attention to our safety and that of our loved ones. We checked which of the products for environmental observation were particularly appreciated by users. Is Ubiquiti UniFi UVC-G3-Micro one of the best? Check out our article.

Related Products