Honeywell Series 3 DC311N

(1 customer review)

$23.99

Description

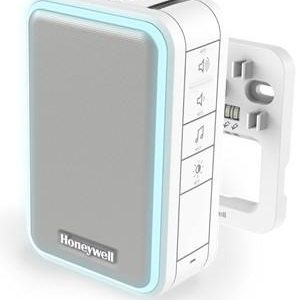
Doorbell, Wireless Doorbell, White, Grey

Honeywell Series 3 DC311N properties

Product nameSeries 3 DC311N
TypeDoorbell
DorbellWireless Doorbell
ColourGrey, White
Number of Ringtones4 pcs
Lighting in Push ButtonYes
Range Wireless Transmitter150 m
Max Volume80 dB
Height11.0 cm
Width7.0 cm
Depth4.25 cm
Weight169.0 g

Additional information

Product name

Product type

Dorbell

Colour

,

Number of Ringtones

Lighting in Push Button

Range Wireless Transmitter

Max Volume

Height

Width

Depth

Weight

1 review for Honeywell Series 3 DC311N

  1. Arya

    As a telemarketer who spends a lot of time at home, I was looking for a reliable doorbell that wouldn’t disturb me during work hours. That’s when I came across the Honeywell Series 3 DC311N doorbell.

    One of the things that caught my attention was its slim design with a width of just 7.0 cm. It’s perfect for my small house and doesn’t take up too much space. The doorbell is also wireless, which means I can place it anywhere without worrying about running wires or cables.

    In terms of the product type, I would say that the Honeywell Series 3 DC311N is one of the best electrical accessories I’ve ever bought. It comes with six different chime options, and I can choose the one that suits me best. The volume control feature is another plus point as I can adjust it according to my needs.

    Compared to other doorbells that I have used in the past, the Honeywell Series 3 DC311N is more reliable. It offers a clear and audible sound that I can hear from any part of my house. Even my visitors have remarked on how the doorbell stands out.

    I ordered the Honeywell Series 3 DC311N doorbell online in December, and it was delivered to me in Bakersfield within a week. The delivery was quick, and I had no issues with the packaging.

    Overall, I would give the Honeywell Series 3 DC311N doorbell a solid 4 out of 5. It’s a reliable, sturdy and feature-rich device that has exceeded my expectations. I would definitely recommend this doorbell to anyone who’s looking for a good product at a reasonable price.

Add a review

Your email address will not be published. Required fields are marked *

Frequently Asked Questions:

What is the proper installation process for the Honeywell Series 3 DC311N thermostat?

The Honeywell Series 3 DC311N Thermostat comes with a pre-installed battery and is designed to be easy to install. Here's the proper installation process:

1. Locate the mounting spot: Choose a location that is near your thermostat control unit and is easily accessible. The ideal location for the DC311N Thermostat is on an interior wall, about 5 feet above the floor. It should be away from direct sunlight or drafts, and at least 6 inches away from any heat source.

2. Remove the old thermostat: If you're replacing a previous thermostat model, turn off power to your heating and cooling system. Carefully remove the old thermostat from the wall bracket.

3. Prepare the wire terminals: The Honeywell DC311N Thermostat comes with a variety of wire terminal options to accommodate different wiring configurations. Consult the user manual to find the correct wire configuration for your system.

4. Install the mounting plate: Attach the included mounting plate to the wall using the included screws and anchors. Make sure that it is level and firmly secured.

5. Insert the thermostat into the mounting plate: Carefully slide the thermostat into the mounting plate, ensuring that all wiring connections are secure.

6. Secure the thermostat to the wall: Once the thermostat is in place, use the included screws and anchors to attach it to the mounting plate on the wall.

7. Reconnect your heating and cooling system: Turn power back on to your heating and cooling system. The DC311N Thermostat will automatically detect your system's settings and configurations.

8. Set up the thermostat: Use the included instructions to set up your Honeywell Series 3 DC311N Thermostat, including programming your preferred temperatures and scheduling settings.

What is the process for resetting the Honeywell DC311N contactor?

The Honeywell DC311N contactor is designed for use in heating and cooling systems, and it can be reset if it becomes stuck or fails to operate. Here's a step-by-step process for resetting the Honeywell DC311N contactor:
1. Turn off the power to the furnace or air conditioning system at the circuit breaker or fuse box.
2. Locate the contactor on the control board or mounted near it. It is typically a large, rectangular device with several terminals.
3. Remove the wires from the contactor's terminal screws using a Phillips head screwdriver. Be sure to remember which wire goes where so you can reconnect them in the correct order later.
4. Using a non-contact voltage tester, make sure there is no voltage present at the contactor terminals. If there is, wait until the power has been turned off for several minutes before proceeding.
5. Locate the reset button or jumper on the contactor. It may be a small button or a pair of jumpers that need to be moved into position. Consult the contactor's documentation if necessary.
6. Press the reset button or move the jumpers into position. The contactor should now be reset and ready to operate.
7. Reconnect the wires to their original terminals in the correct order, making sure they are tight but not over-tightened.
8. Turn the power back on at the circuit breaker or fuse box. Test the contactor to ensure it is functioning properly.
Note: If the contactor continues to malfunction after resetting it, it may be a sign of a larger issue that requires professional repair.

What is the correct installation process for the Honeywell Series 3 DC311N thermostat?

To install a Honeywell Series 3 DC311N programmable thermostat, follow these steps:

Tools Needed:
- Screwdriver
- Voltage Tester (Optional)

Step 1: Turn off Power to the Thermostat
Turn off your furnace or air conditioning unit's power at its source. If you're unsure how, consult your owner's manual or contact a professional. Step 2: Remove Old Thermostat
Remove the old thermostat from the wall by carefully unscrewing it from the mounting plate. Be sure to take note of the wiring configuration and label each wire with electrical tape for reference during installation. Step 3: Install Mounting Plate
Peel off the backing on the double-sided adhesive strip and attach the included metal mounting plate to the wall in your desired location, following manufacturer's guidelines for proper positioning. Step 4: Connect Wires
Locate the corresponding wire terminals on the back of the Honeywell Series 3 DC311N thermostat (usually labeled RH/RC, Rh, Rh-Rc, W1, and G). Match up the wires according to your previous labeling and secure them in place by tightening the screws. Step 5: Install Batteries
Place two AA batteries into the battery compartment located at the bottom of the thermostat, ensuring they are inserted correctly with positive and negative polarity facing the correct direction as indicated on the battery compartment. Step 6: Power Up
Once you've installed batteries, turn your power back on by restoring power to your furnace or air conditioning unit. The thermostat will begin initializing and display a "Setting up" message for a few moments before returning to its regular screen. Step 7: Configure Settings
Follow the on-screen prompts to set up your preferred schedule, comfort settings, and other personalized preferences. You can also use the mobile app (available for iOS and Android) to control your thermostat remotely and receive energy-saving tips. Congratulations! You have now successfully installed a Honeywell Series 3 DC311N programmable thermostat.

How do I change the power cord on my Honeywell Series 3 DC311N thermostat?

To replace the power cord for your Honeywell Series 3 DC311N thermostat, follow these steps:

1. Turn off your heating or cooling system at the furnace or air handler to avoid accidentally activating it during the replacement process. Remove the old power cord from the back of the thermostat by gently pulling on it. Be careful not to pull too hard, as this can damage the wiring inside the thermostat. If necessary, use a small flathead screwdriver to gently pry the tabs holding the old power cord in place on the back of the thermostat. This will allow you to remove the old cord more easily. Insert the new power cord into the back of the thermostat until it snaps into place. Be sure that the wiring is properly aligned with the terminals inside the thermostat. Replace any covers or plates that were removed during the process, making sure they are securely in place. Reattach any screws or fasteners that may have been loosened or removed during the replacement process. Turn your heating or cooling system back on at the furnace or air handler and test the thermostat to ensure it is functioning properly.