Axis M3105-LVE

$292.99

Secure your property with the Axis M3105-LVE Surveillance Camera providing high-quality surveillance footage and built-in IR LEDs for clear monitoring even in the dark.

SKU: 9087494 Category:

Description

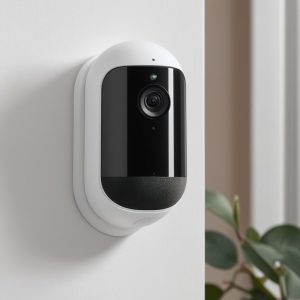
The Axis M3105-LVE is a high-performance surveillance camera that is designed for use in both indoor and outdoor environments. This camera is a great solution for businesses and organizations looking to increase their security and surveillance capabilities.

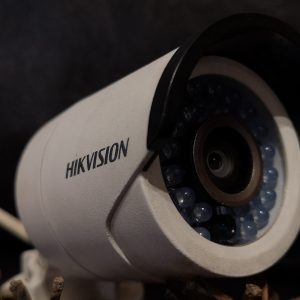
The Axis M3105-LVE offers a wide range of features, including full HD 1080p resolution video, a 2.8mm to 8mm varifocal lens, and 30 frames per second (fps) video capture. This camera also boasts an impressive 1000 TVL (Television Lines) resolution and True WDR (Wide Dynamic Range) technology, which allows it to capture clear and detailed images in both bright and dark lighting conditions.

In addition to its advanced imaging capabilities, the Axis M3105-LVE also features built-in infrared (IR) LEDs that provide excellent night vision capabilities. These IR LEDs allow the camera to capture images up to a distance of 15 meters (50 feet) in complete darkness.

The Axis M3105-LVE is built to withstand tough outdoor environments, with an IP66-rated weatherproof housing that protects it from dust, moisture, and extreme temperatures. It also features a vandal-resistant design, making it a great choice for areas where it may be exposed to potential damage or vandalism.

One of the standout features of the Axis M3105-LVE is its flexible mounting options. This camera can be installed on walls, ceilings, or poles, making it easy to set up in a variety of locations. The camera also features Power over Ethernet (PoE) capability, which allows it to be powered and connected using a single ethernet cable, simplifying the installation process.

The Axis M3105-LVE is also equipped with advanced security features, including HTTPS encryption and IP address filtering, to ensure that your video footage remains secure and protected. The camera also supports multiple simultaneous video streams, allowing users to view live footage on their computer or mobile device, while simultaneously recording footage to a network video recorder (NVR).

Overall, the Axis M3105-LVE is a high-performance surveillance camera that offers advanced features, flexible mounting options, and reliable performance in both indoor and outdoor environments. If you’re looking for a powerful and reliable surveillance solution, the Axis M3105-LVE is definitely worth considering.

Reviews

There are no reviews yet.

Be the first to review “Axis M3105-LVE”

Your email address will not be published. Required fields are marked *

Frequently Asked Questions:

How do I connect my new Axis M3105-LVE camera to my network and access its settings?

To connect your Axis M3105-LVE camera to your network and access its settings, follow these steps:

1. Connect the camera’s Ethernet cable to a LAN switch or router that is connected to your network. Power on the camera using the supplied power adapter. Open a web browser on your computer or mobile device and enter the IP address of the camera into the address bar. The default IP address for the M3105-LVE is 192. If you have changed the IP address, refer to the user manual for the new address. You will be prompted to enter a username and password. The default username is admin and the password is also admin (without quotes). Click Login. Once you are logged in, you can access the camera’s settings by clicking the Configuration icon on the left-hand menu. From here, you can adjust various settings such as video quality, motion detection, network preferences, and more. To save your changes, click Apply at the bottom of each page. If you want to restore the camera's default settings, go to System > Maintenance > Factory Default. Click Restore and confirm with Yes. After configuring your camera, make sure it is securely mounted in the desired location using the included mounting bracket and screws. If you want to view live video from the camera, open a web browser on your computer or mobile device and enter the IP address of the camera into the address bar. You can also use the Axis Camera Station software or compatible NVR/DVR systems to manage and monitor multiple cameras. Remember to change the default username and password to a strong and unique one for added security.

How do I connect my Axis M3105-LVE camera to my network and access its web interface?

To connect your Axis M3105-LVE camera to your network and access its web interface, follow these steps:

1. Connect the camera's Ethernet port to a LAN switch or router using an Ethernet cable. Make sure that the switch or router is connected to your network. Power on the camera by connecting it to a power source using the supplied AC adapter and cable. Wait for the camera to boot up, which should take about 30 seconds. You can check the status of the camera's LED indicator on the front panel. Open a web browser on a computer or mobile device that is connected to the same network as the camera. Type "http://192. Enter. This should take you directly to the login page of the camera's web interface. Alternatively, you can search for the camera on the network using its hostname (which is "m3105-lve" by default). If prompted, enter the username and password for the camera's web interface. The default username is "admin" and the default password is "password". You can change these credentials during the camera's setup wizard or from the Configuration menu. Once you are logged in, you should see the main dashboard of the camera's web interface. From here, you can configure various settings such as network parameters, video streams, storage options, and user management. To save any changes you make, click the Apply button at the bottom of each page or use the Save Settings option from the Configuration menu. If you encounter any issues during the setup process, consult the camera's user manual or contact Axis Support for assistance. Finally, test the connectivity and performance of the camera by accessing its live video stream from a remote location using a supported client software or web browser plugin.

How do I properly install and configure my new Axis M3105-LVE network camera for remote access over the internet?

Here is a step-by-step guide on how to install and configure your new Axis M3105-LVE network camera for remote access over the internet:

Step 1: Unpack and Connect the Camera
First, unpack your Axis M3105-LVE network camera and connect it to your local area network (LAN) using an Ethernet cable. Make sure the power supply is also connected securely. Step 2: Access the Web Interface
Open a web browser on a computer that's connected to the same LAN as the camera, and enter the IP address of the camera into the address bar (you can find this in the documentation provided with your camera). Press Enter to access the web interface. Step 3: Configure Camera Settings
When prompted, create a new user account with a strong password. Then, navigate to the Network tab and configure the following settings:
- IP Address: Set it manually or let the camera automatically assign an IP address from your LAN's DHCP server. Network Mask: Enter the subnet mask for your network. Default Gateway: Enter the IP address of your router or gateway. HTTPS: Enable this setting to secure your communication with the camera using SSL/TLS encryption (optional). Step 4: Configure Remote Access
Next, navigate to the Remote Access tab and configure the following settings:
- Enable Remote Access: Toggle this switch to ON. Port Forwarding: Check if your router supports port forwarding and follow the instructions provided by your router manufacturer to enable it for the camera's HTTPS (443) and RTSP (554) ports. Username and Password: Set these values for remote access authentication. Make sure they are strong and unique from your local account credentials. Enable Dynamic DNS: If you have a dynamic IP address, enable this setting to associate your camera with a domain name instead. You'll need to sign up for a free service like DynDNS or NoIP. Step 5: Test Remote Access
Once all settings are configured, test remote access by connecting to the camera from another computer or device over the internet. Use your web browser's URL bar to enter https://your-camera-domain-name. Step 4 if you enabled dynamic DNS). You should be prompted for your remote access credentials. Step 6: Secure Remote Access
To further secure remote access, consider implementing the following measures:
- Limit Access: Use a firewall or Virtual Private Network (VPN) to restrict access to specific IP addresses or networks. Change Default Usernames and Passwords: Avoid using default credentials and change them immediately after installation. Encrypt Communication: Use SSL/TLS encryption (HTTPS) for all communication between your computer and the camera. Keep Firmware Up to Date: Regularly check for firmware updates and install them promptly to ensure maximum security and functionality. By following these steps, you should be able to properly install and configure your Axis M3105-LVE network camera for remote access over the internet. If you encounter any issues or have further questions, consult the documentation provided with your camera or contact Axis support for assistance.

What are the features of Axis M3105-LVE?

If you are interested in wifi standards, which define speed and method of radio data transmission, are used in Axis M3105-LVE ask the manufacturer. In our article you will find the necessary information about the methods used for radio transmission, and what the magic letters ab, g, n mean. You can find it here.

Is Axis M3105-LVE a flagship product?

The year 2020 will certainly be remembered as the time when we paid special attention to our safety and that of our loved ones. We checked which of the products for environmental observation were particularly appreciated by users. Is Axis M3105-LVE one of the best? Check out our article.

Related Products