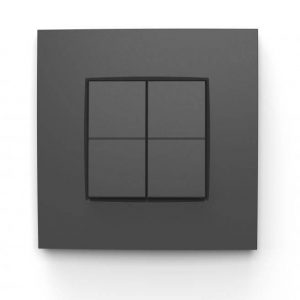
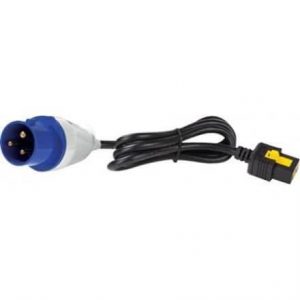
Brennenstuhl 1508040 4-way

£1.65

Description

Adapter, No, White, Wireless

Brennenstuhl 1508040 4-way properties

Product name1508040 4-way
TypeAdapter
USB-outletNo
FeaturesWireless
GroundedNo
Number of USB-outlets0
ColourWhite
Height5.0 cm
Width8.0 cm
Depth7.5 cm
Weight73.0 g

Additional information

Product name

Product type

USB-outlet

Features

Grounded

Number of USB-outlets

Colour

Height

Width

Depth

Weight

Reviews

There are no reviews yet.

Be the first to review “Brennenstuhl 1508040 4-way”

Your email address will not be published. Required fields are marked *

Frequently Asked Questions:

What are the installation instructions for Brennenstuhl 1508040 4-way switch?

To install the Brennenstuhl 1508040 4-way switch, follow these steps:

1. Turn off the power supply to the circuit you are working on. Use a voltage tester to confirm that there is no electricity flowing through the wires before beginning the installation process.
2. Remove the existing 3-way switch or switches and mounting bracket from the wall box.
3. Install the Brennenstuhl 1508040 4-way switch into the wall box, ensuring that it fits snugly.
4. Connect the black (hot) wires from each location to the "L" terminals of the new 4-way switch using wire nuts or cable connectors.
5. Connect the red (traveler) wires from the previous switch or switches to the "R" terminals of the Brennenstuhl 1508040 4-way switch. If you have two traveler wires, use a wire nut to connect them together before attaching it to the terminal.
6. Connect the white (neutral) wires from each location to the "W" terminals of the new 4-way switch using wire nuts or cable connectors.
7. Turn on the power supply and test the switch to ensure proper functionality. If everything works correctly, securely fasten the wall plate over the Brennenstuhl 1508040 4-way switch.

How do I correctly install and connect the Brennenstuhl 1508040 4-way in my electrical setup?

To install and connect the Brennenstuhl 1508040 4-way, follow these steps:

1. Locate a suitable location for the 4-way. It should be installed near the point where two circuits meet or split apart. Make sure it's accessible and within reach of the wiring you need to connect. Turn off the power to the circuit at the main electrical panel. This will prevent any electrical hazards while you work on the installation. Remove the cover plates from both circuits that will be connected using a screwdriver. This will give you access to the wiring inside. Strip about ⅝ inch (15mm) of insulation off the end of each wire that will be connected to the 4-way. Make sure to strip all four wires on both circuits to match the configuration of the 4-way's terminals. Connect the wires from one circuit to the corresponding terminals on the 4-way, following the colors of the wire (white for neutral, black or red for hot, and green or bare copper for ground). Twist each set of wires together tightly using a pair of wire strippers or pliers. Repeat step 5 with the wiring from the second circuit, connecting them to their respective terminals on the 4-way. Make sure that all connections are secure and tight. Once all wires are connected, replace the cover plates on both circuits and turn the power back on at the main electrical panel. Test the connections by turning on appliances or lights connected to each circuit. Ensure that there are no electrical issues or tripped circuit breakers. If everything is working properly, attach the 4-way securely to the wall using screws and a screwdriver. Make sure it's level and aligned with the wiring connections. Finally, attach any necessary labels or tags to the cover plates to indicate that a 4-way has been installed in each circuit. This will help prevent any confusion or errors in future electrical work.

"How do I properly connect and use the Brennenstuhl 1508040 4-way adapter in my electrical system?"

To properly connect and use the Brennenstuhl 1508040 4-way adapter in your electrical system, follow these steps:

1. Ensure that your vehicle is parked on a level surface, and the engine is turned off. Locate the electrical circuit you want to connect the adapter to. This could be a trailer socket, RV connection point, or any other electrical outlet in your vehicle's electrical system. Clean both the mating surfaces of the circuits with a dry cloth to remove dirt and debris. Insert one end of the adapter into the first electrical circuit (the one you want to connect to). Make sure that the pins are properly aligned, and there is no resistance or wobbling when inserted. Insert the second end of the adapter into the second electrical circuit (where you want to send power). Again, ensure proper alignment and fit. Test the connection by turning on any devices that require power from both circuits. Make sure there are no issues or loss of power. If necessary, secure the adapter in place using the included screws or clamps. This will prevent it from coming loose during use. Store and transport the adapter properly to prevent damage or misuse. Remember, always follow proper safety precautions when working with electrical systems, and consult your vehicle's owner's manual for specific instructions on connecting and using adapters in your system.

How do I properly install and connect the Brennenstuhl 1508040 4-way to ensure safe and reliable operation of my electrical system?

To properly install and connect the Brennenstuhl 1508040 4-way, follow these steps:

1. First, make sure you have all the necessary tools and equipment for the installation. This includes a multimeter, wire cutters, wire strippers, crimp connectors, and electrical tape. Before beginning any work, ensure that the power to the circuit is turned off at the main breaker or fuse box. Test the circuit with a multimeter to confirm that no voltage is present. Carefully remove the old 4-way connector from the electrical system. Be sure to disconnect all wires and label them for reference during the installation process. Prepare the Brennenstuhl 1508040 4-way by separating the individual connectors according to their intended use (power, ground, hot, neutral). This will ensure that you are connecting the correct wires to the appropriate terminals. Strip approximately 3/4 inch of insulation from the ends of each wire using the wire strippers. Be careful not to damage the wire or expose too much copper. Apply a small amount of electrical tape to the end of each stripped wire to prevent any strands from becoming loose during connection. Connect the hot and neutral wires from the circuit being connected to their respective terminals on the Brennenstuhl 1508040 4-way. Be sure to connect the white neutral wire to the silver terminal and the black hot wire to the brass terminal. Use crimp connectors to secure each connection. Connect the ground wire from the circuit being connected to the green terminal on the Brennenstuhl 1508040 4-way. Again, use a crimp connector to ensure a secure connection. Once all wires are properly connected and secured, carefully replace the Brennenstuhl 1508040 4-way into the electrical system. Make sure all connections are tight and secure, but avoid over-tightening as this can damage the connectors. Test the circuit with a multimeter to ensure that power is being delivered to the connected devices properly. By following these steps, you can ensure that your Brennenstuhl 1508040 4-way is installed and connected safely and reliably, providing you with safe and uninterrupted electrical power.