Swann SWNVK-490SD2 2-pack

$168.99

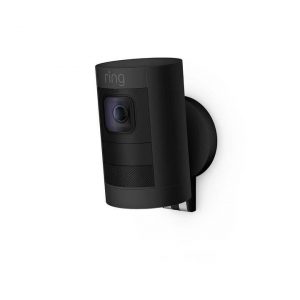
Protect your home or business with the Swann SWNVK-490SD2 2-pack surveillance cameras, providing high-quality video footage and reliable security monitoring.

SKU: 10253976 Category: Tags: ,

Description

Bullet, Wi-Fi, EthernetNumber of Cameras 2 Motion Sensor, Mobile App Controlled, IR-Cut Filter, Outdoor Usage, 1920×1080

Additional information

Product name

Features

, , ,

Connections

Height

Width

Depth

Reviews

There are no reviews yet.

Be the first to review “Swann SWNVK-490SD2 2-pack”

Your email address will not be published. Required fields are marked *

Frequently Asked Questions:

How do I access the live feed from my Swann SWNVK-490SD2 cameras using the provided software?

To access the live feed from your Swann SWNVK-490SD2 cameras using the provided software, follow these steps:
1. Connect the DVR to your computer using an Ethernet cable and power on both devices. Download and install the SwannView Link 8 software from the manufacturer's website or CD that came with your DVR. Launch the software and click "Add New Device" in the bottom left corner of the main window. In the Add New Device wizard, select "Swann Network Video Recorder (DVR)" and click "Next". Enter the IP address and login credentials for your DVR in the provided fields. You can find this information on the back of your DVR or by referring to the user manual. Click "Test Connection" to confirm that the software is able to connect to your DVR. If successful, click "Finish". The live feed from your cameras should now appear in the main window. You can adjust the video quality and other settings by right-clicking on a camera and selecting "Properties". To view multiple cameras at once, drag and drop them into the preview area or use the layout editor to arrange them as desired. Use the playback, search, and other features of the software to review recorded footage or set up motion detection alerts for specific areas. Save any changes or configurations by clicking "File" > "Save Configuration" in the main menu. If you have multiple Swann DVRs on your network, repeat these steps to add each one individually. You can then switch between them using the device list in the bottom left corner of the software window.

How do I properly install and set up my new Swann SWNVK-490SD2 2-pack of surveillance cameras?

Here's a step-by-step guide on how to install and set up your new Swann SWNVK-490SD2 2-pack of surveillance cameras:

1. Unpack the Cameras: Firstly, unpack all the components from their respective boxes. Make sure you have the cameras, power cords, screws, mounting brackets, and user manuals. Choose a Location: Decide on the best location to install your cameras based on your surveillance needs. Ensure that they are placed in an area with good lighting conditions and line of sight to cover the desired areas. Connect Power Supply: Connect one end of the power cord from each camera to the power supply unit (PSU), and the other end to a power outlet. Make sure you have enough power outlets for all the cameras. Mount the Cameras: Using screws and mounting brackets, fix the cameras onto their respective locations. Ensure that they are leveled properly. Connect Cameras to PSU: Connect the RCA cables from each camera to the corresponding ports on the PSU. Make sure you connect the yellow (video) cable to the video port, and the red (audio) cable to the audio port. Connect Camera to DVR: Connect each camera's BNC cable to the corresponding ports on the Digital Video Recorder (DVR). Ensure that you connect the correct cameras to their respective ports. Run Configuration Wizard: Turn on your DVR and run the configuration wizard to set up your cameras. Follow the on-screen instructions, entering the required details such as camera names, passwords, and time zones. Adjust Camera Settings: After completing the wizard, you can adjust camera settings such as motion detection sensitivity, recording quality, and alarm settings using the DVR's interface. Test Cameras: Once everything is set up, test your cameras to make sure they are working properly. You should be able to view live footage on the DVR or through a remote connection via the internet. Adjust Network Settings (Optional): If you want to access your cameras remotely via the internet, you'll need to configure your network settings by connecting your DVR to your router using an Ethernet cable. Follow the instructions in the user manual for detailed guidance. By following these steps, you should be able to install and set up your Swann SWNVK-490SD2 2-pack of surveillance cameras with ease. If you encounter any issues during the process, consult the user manual or contact Swann customer support for further assistance.

"How do I connect my Swann SWNVK-490SD2 cameras to my WiFi network?"

Ensure that your Swann cameras are within range of your WiFi network. If you're not sure, you can check the signal strength by accessing the camera's settings menu and selecting "WiFi". The signal strength will be displayed as a number or a series of bars. Go to your router's configuration page by entering its IP address into a web browser on your computer or mobile device. This is usually printed on the bottom of your router, but you can also find it in the documentation that came with the router. Log in to your router using your username and password. If you haven't changed these from their defaults, they should be printed on the bottom of your router as well. Locate the "WiFi Settings" or "Wireless Settings" section of your router's configuration page. This will vary depending on the make and model of your router. Look for an option to add a new device to your network, and follow the prompts to input the necessary information about your Swann cameras. You may need to enter the camera's MAC address (which you can find in the camera's settings menu) or select it from a list of available devices. Save your changes and test the connection by accessing your camera's live stream through the Swann app on your mobile device or computer. If the cameras are connected successfully, you should be able to see video footage from them. If you experience any issues with connecting your cameras to your WiFi network, make sure that your router is using a 2. GHz frequency (which is compatible with Swann's wireless cameras) and that there are no other devices on the network causing interference. You may also need to reset your cameras or restart your router to establish a new connection. Remember to secure your WiFi network by setting a strong password and encrypting your traffic using WPA2-AES encryption (if available). This will help protect your camera footage from unauthorized access. If you need further assistance with connecting your Swann cameras to your WiFi network, consult the user manual or contact Swann's customer support for additional guidance.

What are the features of Swann SWNVK-490SD2 2-pack?

If you are interested in wifi standards, which define speed and method of radio data transmission, are used in Swann SWNVK-490SD2 2-pack , it has IR-Cut Filter, Mobile App Controlled, Motion Sensor, Outdoor Usage. In our article you will find the necessary information about the methods used for radio transmission, and what the magic letters ab, g, n mean. You can find it here.

Is Swann SWNVK-490SD2 2-pack a flagship product?

The year 2020 will certainly be remembered as the time when we paid special attention to our safety and that of our loved ones. We checked which of the products for environmental observation were particularly appreciated by users. Is Swann SWNVK-490SD2 2-pack one of the best? Check out our article.