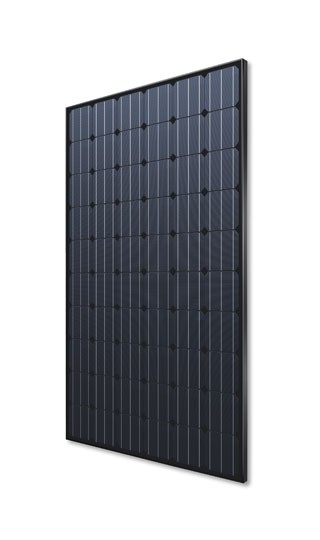
Axitec AXIblackpremium AC-300M/156-60S

$142.00

The Axitec AXIblackpremium AC-300M/156-60S is a monocrystalline solar panel with a power output of 300 watts and a module efficiency of 19.2%. It is manufactured by Axitec, a company that specializes in high-performance solar panels for various applications. This panel features a black frame and backsheet that provides a sleek and modern look to the panel.

SKU: axitec-axiblackpremium-ac-300m-156-60s Category: Tags: , ,

Description

Axitec AXIblackpremium AC-300M/156-60S solar panel

Aesthetics meets energy. The solar modules are perfectly suited for installations where the black exterior design must match the high power output.

The advantages:

  • 15 years manufacturer‘s warranty
  • Highest performance due to specifically selected technologies and materials
  • Guaranteed positive power tolerance from 0-5 Wp by individual measurement
  • Maximum 5400 Pa snow load
  • 100 % electroluminescence inspection
  • High quality junction box and connector systems
  • High stability due to AXITEC-Soft-Grip-Seam aluminium frame construction

Reviews

There are no reviews yet.

Be the first to review “Axitec AXIblackpremium AC-300M/156-60S”

Your email address will not be published. Required fields are marked *

Frequently Asked Questions:

How do I properly install and connect the Axitec AXIblackpremium AC-300M/156-60S solar panels to a grid-connected system?

To properly install and connect Axitec AXIblackpremium AC-300M/156-60S solar panels to a grid-connected system, follow these steps:

1. Ensure that the installation location meets all the necessary requirements for solar panel installation. This includes checking for shading, wind loads, and structural integrity of the roof or mounting structure. Clean the surface where the solar panels will be installed. Remove any debris, dirt, or contaminants to ensure good adhesion of the panels. Install the solar panels according to the manufacturer's instructions. This may involve attaching them to the roof or mounting structure using appropriate brackets and hardware. Connect the AC-300M/156-60S solar panels to a grid-connected inverter using standard MC4 connectors. Ensure that the wiring is securely connected and properly labeled. Install a combiner box to combine the output of multiple strings of solar panels into a single feed to the inverter. Use appropriate circuit breakers and fuses to protect the system from overcurrents. Connect the AC-300M/156-60S solar panels to the electrical grid using appropriate wiring and equipment. Ensure that the connection is made in compliance with all relevant safety standards and codes. Test the system to ensure proper operation and performance. Monitor the output of the solar panels regularly to identify any issues or malfunctions. Regularly maintain the AC-300M/156-60S solar panels and the grid-connected system to ensure optimal performance and longevity. This may involve cleaning the panels, checking the connections, and inspecting the wiring for damage or wear.

How do I properly install and connect the wiring for the Axitec AXIblackpremium AC-300M/156-60S solar panels in my system?

To properly install and connect the wiring for the Axitec AXIblackpremium AC-300M/156-60S solar panels, follow these steps:

1. Clean the installation surface: Before installing the solar panel, make sure the surface is clean, dry, and free from debris or dirt. Use a cloth to wipe the surface down and let it air dry before proceeding. Prepare the panel: Remove the panels from their packaging and inspect them for any damage. Make sure all the components are present and in good condition. Mount the panels: Follow the manufacturer's instructions to mount the panels securely on your roof or ground. Use appropriate hardware to ensure that the panels are level, aligned, and properly spaced from each other. Connect the wiring: First, connect the positive (+) bus bars of adjacent panels together using MC4 connectors. Then, connect the negative (-) bus bars in the same way. Make sure all connections are tight and secure. Route the wiring: After connecting the panels, route the wiring to the nearest junction box or combiner box. Use appropriate wiring methods to ensure that the wires are protected from weather, rodents, and other hazards. Connect the wiring to the junction/combiner box: Follow the manufacturer's instructions to properly connect the wiring to the junction/combiner box. Make sure all connections are tight and secure. Install the combiner box: If your system requires a combiner box, follow the manufacturer's instructions to install it in a safe and accessible location. Connect the wiring from the panels to the combiner box using appropriate connectors. Test the system: Once everything is properly connected, test the solar panel system to ensure that it is functioning correctly. Use a multimeter or similar device to measure the voltage, current, and power output of each panel and the overall system. Make any necessary adjustments or repairs as needed. Monitor the system: Regularly monitor the solar panel system to ensure that it is performing at peak efficiency. Keep the panels clean and free from debris, and replace any damaged components as soon as possible. By following these steps, you can properly install and connect the wiring for your Axitec AXIblackpremium AC-300M/156-60S solar panels, ensuring maximum efficiency and reliability. Remember to always put safety first and follow all applicable codes and standards when working with electrical systems.

How do I troubleshoot low power output on my Axitec AXIblackpremium AC-300M/156-60S solar panels?

If you are experiencing low power output from your Axitec AXIblackpremium AC-300M/156-60S solar panels, there are several steps you can follow to troubleshoot the issue:

1. Check for shade: Solar panels should be installed in an area with minimal shading. Make sure there are no obstructions blocking sunlight from reaching the panels. If possible, use a shadow meter or shading analyzer tool to measure the amount of shade on each panel and identify any areas that may be causing low power output. Check connections: Make sure all connections between the solar panels and other components (such as the inverter and charge controller) are secure and properly made. Loose connections can cause a loss of power or voltage drop, which can lead to reduced output. Monitor weather conditions: Solar panel performance can be affected by weather conditions such as clouds, wind, and temperature. If you notice low power output during certain times of day or in specific weather conditions, this could indicate that your system is not properly sized for your location's average weather patterns. Check system voltage: Use a voltmeter to measure the voltage at the solar panel output terminals. The voltage should be within the specified range for your system. If the voltage is consistently lower than expected, this could indicate a problem with the panels or wiring. Test individual panels: If possible, test each panel separately to determine if the issue is isolated to one or more specific panels. This can help you identify any damaged or faulty panels that may need to be replaced. Contact customer support: If you have tried these troubleshooting steps and still cannot resolve the low power output issue, contact Axitec customer support for further assistance. They can provide additional guidance based on your specific system configuration and location. Remember to always perform safety precautions when working with electrical components, such as wearing protective equipment and ensuring that all connections are properly insulated and secured.

How do I properly install and connect the Axitec AXIblackpremium AC-300M/156-60S solar panels to my power system?

To properly install and connect the Axitec AXIblackpremium AC-300M/156-60S solar panels to your power system, follow these steps:

1. First, make sure that you have all the necessary tools and equipment for installation, including a drill, screws, a wrench, electrical connectors, and wire nuts. Choose a location for the solar panels that receives plenty of direct sunlight, ideally facing south if you're in the Northern Hemisphere or north if you're in the Southern Hemisphere. Make sure that the area is free from shading and obstruction, such as trees or buildings. Prepare the surface where you will mount the solar panels by cleaning it thoroughly to remove any dirt, dust, or debris. If necessary, apply a coat of sealant or waterproofing material to prevent moisture from entering the electrical connections. Follow the manufacturer's instructions for attaching the mounting brackets to the roof or structure where you will install the solar panels. Make sure that the brackets are securely fastened and level. Carefully lift the solar panel into place on the mounting bracket, making sure that it is aligned correctly and securely attached to the bracket. Repeat for each additional panel. Connect the positive (red) and negative (black) wires from each solar panel to your power system using electrical connectors and wire nuts. Make sure that the connections are tight and secure, but don't over-tighten as this can damage the wiring. Use a multimeter or voltage meter to check that all of the solar panels are connected correctly and producing power. If you notice any issues with the electrical connections, double-check that they are properly attached and try again. Once all of the solar panels are installed and connected, test your entire power system by switching it on and monitoring its performance. Make sure that everything is functioning smoothly and that the solar panels are providing enough power to meet your needs. Finally, make sure to regularly maintain your solar panel system, including cleaning the panels to remove any dirt or debris that may have accumulated over time, checking the electrical connections for damage or wear, and inspecting the mounting brackets for signs of loosening or corrosion. By following these steps and taking proper care of your solar panel system, you can ensure that it provides reliable, efficient power for years to come.

Related Products