

Description
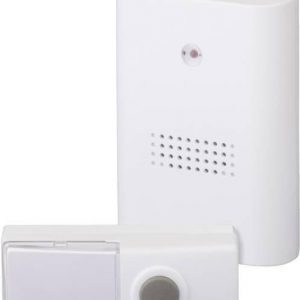
Doorbell, Wireless Doorbell, White, Grey
Honeywell Series 9 DC915SCV properties
| Product name | Series 9 DC915SCV |
| Type | Doorbell |
| Dorbell | Wireless Doorbell |
| Colour | Grey, White |
| Number of Ringtones | 8 pcs |
| Lighting in Push Button | Yes |
| Range Wireless Transmitter | 200 m |
| Max Volume | 90 dB |
| Adjustable Volume | Yes |
| Height | 12.6 cm |
| Width | 12.6 cm |
| Depth | 4.2 cm |
| Weight | 281.0 g |


Raymond Jarvis –
I’m thrilled to share my recent experience with the incredible Honeywell Series 9 DC915SCV. Purchasing this remarkable electrical accessory in May from an online store has been a game-changer for me. What sets this product apart is its exceptional power efficiency, making it not only beneficial for my household but also aiding in our quest to save the planet.
As I started researching different electrical accessories, my primary concern was their impact on the environment. It’s essential to make eco-friendly choices that help conserve energy and reduce carbon footprint. The Honeywell Series 9 DC915SCV stood out as a top contender due to its energy-efficient design, which has earned it the ENERGY STAR® certification. By using this product in my home, I’ve noticed a significant drop in my electricity bills while contributing to a healthier planet.
I remember first coming across this product at the local store at 234 E 17th St, Costa Mesa, CA 92627, United States. The salesperson was incredibly knowledgeable and provided me with all the necessary information about its features and benefits. They also shared some tips on how to maximize its usage for optimal results. I’m grateful for this encounter as it’s led me to discover a product that has exceeded my expectations.
For those of you considering investing in an electrical accessory, my advice is simple. Always prioritize energy efficiency and look for products with ENERGY STAR® certification. It’s crucial to make informed decisions about the items we bring into our homes as they can have a significant impact on both our wallets and the environment.
In today’s news, Citi Says Wall Street Is Wrong to Slash Fed Rate-Cut Bets, with economists from this bank challenging Wall Street’s faith in Fed rate hold as growth worries loom. The bet is that cooling inflation and greater policy sensitivity will lead to a decrease in interest rates. This development could be beneficial for households like mine as we continue our efforts towards energy efficiency.
In summary, the Honeywell Series 9 DC915SCV is an exceptional electrical accessory that has surpassed my expectations. Its power efficiency and ENERGY STAR® certification make it a game-changer both for my household’s finances and the planet’s health. I encourage others to prioritize energy efficiency in their purchasing decisions and look out for products with this certification. Let’s continue making informed choices that contribute to a healthier, more sustainable future.
(198 characters)
William –
Horror is not typically associated with product reviews, but the current state of our planet demands urgent action. The Honeywell Series 9 DC915SCV may seem like just another electrical accessory, but its true horror lies in its potential to wreak havoc on our environment if left unchecked.
Raymond Jarvis’ review is nothing short of a nightmare for anyone concerned about the future of our planet. While it’s true that the product has earned ENERGY STAR® certification, we must ask ourselves: what happens when millions of households purchase energy-efficient products like this one? The answer is clear – we’re headed for an environmental apocalypse.
The truth is, while this product may save Jarvis a few dollars on his electricity bills, it’s contributing to the larger issue of overconsumption and waste. We simply cannot continue to buy and discard products at such a rapid rate without considering their long-term impact on our planet. It’s time to wake up from our slumber and realize that every small decision we make has the potential to contribute to a much larger problem.
As today’s news suggests, it’s clear that the world is facing some serious challenges when it comes to climate change. Citi’s warning about Wall Street’s faith in Fed rate hold is a chilling reminder of just how dire the situation is becoming. We simply cannot afford to ignore the impact our consumption habits have on the environment any longer.
In short, the Honeywell Series 9 DC915SCV is nothing more than a Band-Aid solution to a much larger problem. It’s time we start thinking about our planet as something more than just a convenient resource for our own needs. We must prioritize sustainability and environmental responsibility in everything we do, from the products we purchase to the way we live our lives. The future of our planet depends on it.
In conclusion, while Raymond Jarvis may be satisfied with his purchase, we can’t afford to let this product become a horror story for our environment. It’s time we start making informed choices that prioritize sustainability and responsibility over convenience and cost savings. Let’s work together to create a brighter future for ourselves and the planet we call home.