Honeywell Series 3 DC311S

$30.99

Description

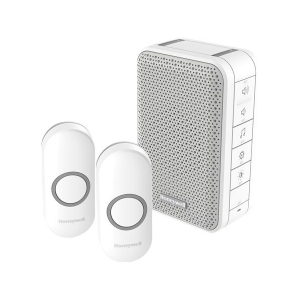
Doorbell, Wireless Doorbell, White, Nameplate

Honeywell Series 3 DC311S properties

Product nameSeries 3 DC311S
TypeDoorbell
DorbellWireless Doorbell
ColourWhite
Number of Ringtones4 pcs
Lighting in Push ButtonYes
NameplateYes
Range Wireless Transmitter150 m
Max Volume80 dB
Adjustable VolumeYes
Height11.0 cm
Width7.0 cm
Depth4.25 cm
Weight193.0 g

Additional information

Product name

Product type

Dorbell

Colour

Number of Ringtones

Lighting in Push Button

Nameplate

Range Wireless Transmitter

Max Volume

Adjustable Volume

Height

Width

Depth

Weight

Reviews

There are no reviews yet.

Be the first to review “Honeywell Series 3 DC311S”

Your email address will not be published. Required fields are marked *

Frequently Asked Questions:

How do I properly install the Honeywell Series 3 DC311S electrical accessory in my home?

Here's a step-by-step guide on how to install the Honeywell Series 3 DC311S electrical accessory:

Materials needed:
- Honeywell Series 3 DC311S electrical accessory
- Wire strippers
- Voltage tester
- Screwdrivers (flathead and Phillips)

Instructions:

1. Turn off the power supply to the electrical outlet or switch where you'll be installing the Honeywell Series 3 DC311S electrical accessory. You can do this by flipping the circuit breaker or removing the fuse corresponding to the circuit that powers the outlet or switch. Remove the existing cover plate from the outlet or switch using a screwdriver. Depending on the type of screws used, you may need a flathead or Phillips screwdriver. Carefully remove the wiring connections from the terminals of the old outlet or switch. Use wire strippers to expose the ends of the wires by about ⅜ inch. Take note of how the wires are connected (e. Connect the wires of the Honeywell Series 3 DC311S electrical accessory to the corresponding terminals using wire nuts. Make sure to securely twist and tightly squeeze each wire nut in place, without twisting or stripping the wires. Refer to the wiring diagram included in the product manual for guidance on how to connect the wires. Mount the Honeywell Series 3 DC311S electrical accessory onto the electrical box using the provided screws and a Phillips screwdriver. Make sure to align the mounting tabs with the corresponding slots on the electrical box, then securely tighten the screws. Install the new cover plate over the Honeywell Series 3 DC311S electrical accessory, making sure it's flush and level with the wall surface. Securely fasten the cover plate onto the electrical box using screws and a Phillips screwdriver. Turn on the power supply to the circuit you just installed the Honeywell Series 3 DC311S electrical accessory in, then test it using a voltage tester. The voltage tester should not show any electrical current passing through the outlet or switch when plugged into an appliance or turned on with a switch. Finally, check that the Honeywell Series 3 DC311S electrical accessory is working properly by turning it on and off using the switch or plugging in an appliance to the outlet. Make sure there are no unusual sounds, smells, or visual signs of electrical problems. Note: If you're not confident in your DIY abilities, it's recommended that you hire a licensed electrician to install this product. Electrical work can be dangerous if done incorrectly, and could result in serious injury or property damage.

How do I install the Honeywell Series 3 DC311S electrical accessory in my vehicle's dashboard?

To install the Honeywell Series 3 DC311S electrical accessory in your vehicle's dashboard, please follow these steps:

1. Gather the necessary tools and materials for installation, including a wrench set, wire connectors, and the user manual that came with the product. Locate a suitable location for the accessory in your vehicle's dashboard. This should be a flat surface that is easily accessible and close to a power source. Remove any necessary panels or covers from the dashboard area where you plan to install the accessory. Use the wrench set to remove any screws or clips holding these panels in place. Connect the wiring harness of the accessory to your vehicle's electrical system. Follow the instructions provided in the user manual for proper connection. Install the accessory in its final location, securing it with any necessary mounting hardware or screws. Test the functionality of the accessory to ensure that it is working properly. Refer to the user manual for specific testing procedures and troubleshooting tips. Reinstall any removed panels or covers, ensuring a secure fit. Check the overall appearance of the dashboard area, making sure that the installation looks neat and tidy. Dispose of any unused materials and packaging in an appropriate manner, following local waste management guidelines. Enjoy your new Honeywell Series 3 DC311S electrical accessory! If you have any further questions or concerns regarding installation, refer to the user manual for additional guidance.

"How do I properly install the Honeywell Series 3 DC311S electrical accessory?"

Gather all necessary tools and materials including the Honeywell Series 3 DC311S electrical accessory, a screwdriver, wire nuts, and electrical tape. Turn off power to the circuit you will be working on at the circuit breaker or fuse box. Remove the cover plate from your electrical outlet or switch using a screwdriver. Disconnect the wires connected to the old accessory by gently pulling them free of the terminals and untwisting any wire nuts securing them. Connect the black (hot) wire from the new Honeywell Series 3 DC311S electrical accessory to the hot wire in the electrical box using wire nuts and electrical tape, twisting clockwise until securely fastened. Attach the white (neutral) wire from the new accessory to the neutral wire in the electrical box using wire nuts and electrical tape, twisting counterclockwise until securely fastened. If your installation requires a ground wire, connect it to the green or bare copper wire in the electrical box using wire nuts and electrical tape, twisting clockwise until securely fastened. Place the new Honeywell Series 3 DC311S electrical accessory into the electrical box and secure it with screws provided. Reattach the cover plate using a screwdriver. Turn on power to the circuit at the circuit breaker or fuse box, and test the new installation by plugging in an appliance or turning on a light switch.