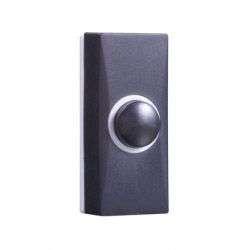
Honeywell DCP311

$16.99

Description

Doorbell, Wireless Doorbell, White

Honeywell DCP311 properties

Product nameDCP311
TypeDoorbell
DorbellWireless Doorbell
ColourWhite
Lighting in Push ButtonYes
Range Wireless Transmitter200 m
Height3.0 cm
Width7.0 cm
Depth1.6 cm
Weight23.5 g

Additional information

Product name

Product type

Dorbell

Colour

Lighting in Push Button

Range Wireless Transmitter

Height

Width

Depth

Weight

1 review for Honeywell DCP311

  1. George

    I recently got my hands on the Honeywell DCP311 electrical accessory and I must say, I was pretty disappointed with it. Firstly, it’s incredibly bulky and takes up a lot of space – the device is about 7.0 cm in height and width, which is far larger than other electrical accessories I’ve used before. It’s not exactly the most aesthetically pleasing piece of tech either, which isn’t too important, but it’s always a bonus when the products we use are easy on the eyes.

    In terms of functionality, the DCP311 is pretty average. It does the job it’s supposed to do in terms of converting DC voltage to AC voltage, but it’s not particularly quick or responsive. I also found that it tended to overheat quite quickly, which is something I’ve never experienced with other electrical accessories. This worried me a bit as I’m not sure it would be safe to use for long periods of time.

    Overall, I have to say I’m pretty underwhelmed with the Honeywell DCP311. There are just too many issues with it that I can’t overlook. If you’re in the market for an electrical accessory, I’d recommend looking elsewhere – there are much better options out there in terms of functionality, durability and aesthetics.

Add a review

Your email address will not be published. Required fields are marked *

Frequently Asked Questions:

What is the procedure for setting up and configuring a Honeywell DCP311 for the first time?

Setting up and configuring a Honeywell DCP311 for the first time involves several steps. Here's a detailed guide on how to do it:
1. **Mounting the Sensor:** Begin by mounting the Honeywell DCP311 door/window contact sensor on the door or window frame using the provided double-sided adhesive tape. Ensure that the sensor is aligned properly and making good contact with both the door/window and the magnetic plate.
2. **Testing the Sensor:** Test the sensor by closing and opening the door/window several times to ensure that the contact is being made each time. If the LED on the sensor is flashing, then it's working correctly.
3. **Configuring the Sensor:** The Honeywell DCP311 sensor should be in learn mode when first installed. To put it into learn mode, press and hold the small button on the back of the sensor for about 5 seconds until the LED starts flashing rapidly. Release the button.
4. **Adding the Sensor to Your System:** Log in to your home security system's web interface or mobile app and navigate to the "Add Device" or "Add Sensor" section. Follow the on-screen instructions to add a new door/window sensor. During this process, you may be prompted to enter a code that is printed on the label of the sensor. This is known as the "factory reset" code, and it's required to pair the sensor with your system.
5. **Testing the Connection:** Once the sensor has been added to your system, test the connection by opening and closing the door/window several times. The app or web interface should display a message confirming that the sensor has been triggered each time.
6. **Arm and Disarm the System:** Finally, arm and disarm the system to ensure that the new sensor is working properly with the rest of your security system. If you encounter any issues during this process, consult the user manual or contact the support team for your home security system.

How do I properly install and program my new Honeywell DCP311 programmable thermostat for optimal energy efficiency in my home?

Here's a step-by-step guide on how to install and program your new Honeywell DCP311 programmable thermostat:

Installation:

1. Turn off power supply to the thermostat by switching off the circuit breaker or removing the fuse that controls the heating and cooling system. Remove the old thermostat by disconnecting it from the wiring, carefully pulling it out of the wall, and detaching the mounting plate from the wall using a screwdriver. Install the DCP311's mounting plate onto the wall, aligning it with the existing holes made for the old thermostat. Use the included screws to fasten the plate securely. Connect the wires to the appropriate terminals on the thermostat following the provided wiring diagram. Ensure that each wire is securely and correctly connected, avoiding any mistakes or cross-connections. Attach the DCP311 to the mounting plate using the included screws and brackets. Make sure it is level. Restore power supply to the heating and cooling system by switching on the circuit breaker or replacing the fuse. Programming:

1. Press the "SETUP" button on the thermostat, then press "7" to select "Quick Set". Follow the on-screen instructions to enter your location's time zone and daylight saving time (DST) settings. Select "24 Hour Clock" from the menu if you prefer a 24-hour clock format. Choose the type of heating system installed in your home: heat pump, gas furnace, oil furnace or conventional AC. This information is essential for accurate temperature control. Set up the "Weekday" and "Weekend" temperature schedules using the "UP" and "DOWN" arrows to adjust the temperature at different times of day. Press "SAVE" once you're done. To create a vacation schedule, select "VACATION MODE", then set the start and end dates for your trip using the "UP" and "DOWN" arrows. Your thermostat will now operate in energy-saving mode during your absence. Confirm that the thermostat has been programmed correctly by checking that all temperatures and schedules are correct. You can also access additional settings like fan control, humidity control, and air filter reminders through the menu options. To ensure optimal energy efficiency, consider using a programmable thermostat with a learning feature such as the Honeywell Home T9 or the Lyric T5 to automatically adjust temperatures based on your daily routines and preferences.