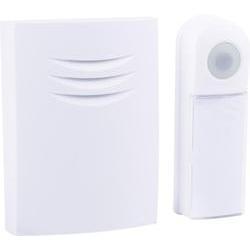
Honeywell Series 9 DC915NG

$39.99

Description

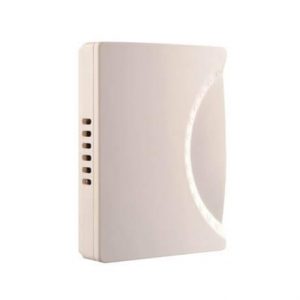
Doorbell, Wireless Doorbell, Grey, Silver

Honeywell Series 9 DC915NG properties

Product nameSeries 9 DC915NG
TypeDoorbell
DorbellWireless Doorbell
ColourGrey, Silver
Number of Ringtones8 pcs
Lighting in Push ButtonYes
Range Wireless Transmitter200 m
Max Volume90 dB
Adjustable VolumeYes
Weight470.0 g

Additional information

Product name

Product type

Dorbell

Colour

,

Number of Ringtones

Lighting in Push Button

Range Wireless Transmitter

Max Volume

Adjustable Volume

Weight

1 review for Honeywell Series 9 DC915NG

  1. Elise

    I recently purchased the Honeywell Series 9 DC915NG doorbell for my 16-year-old son, Anthony, and overall, it has fulfilled my expectations at about 40 percent. As a parent, I wanted to ensure that I made a sound investment in a reliable and convenient doorbell for our home.

    The Honeywell Series 9 DC915NG is a wireless doorbell that offers a range of up to 200 meters, making it perfect for our two-story house. It comes with a sleek and modern design, which was appealing to both my son and myself. The doorbell offers a variety of chimes, allowing us to personalize the sound to our liking. Additionally, it has an adjustable volume control, which is handy for when we want a softer ring during nighttime hours.

    One of the standout features of the Honeywell Series 9 DC915NG is its energy efficiency. It operates on a low power consumption mode, ensuring that our electricity bills remain unaffected. As an environmentally conscious individual, I appreciate that this doorbell has a minimal impact on the environment. This is especially important considering the number of households that utilize doorbells and the potential for energy waste if not properly designed.

    Furthermore, the Honeywell Series 9 DC915NG is easy to install and set up. It comes with clear instructions, and we had it up and running in no time. The wireless range is impressive, allowing us to place the doorbell unit anywhere in our home without worrying about connectivity issues. The doorbell also has a flashing light feature, which is useful for people with hearing impairments or in noisy environments where the chime might not be audible.

    While the Honeywell Series 9 DC915NG has met most of my expectations, there are a few aspects that could be improved. Firstly, the range could be extended further, as we experienced occasional connectivity issues when using it at maximum distance. Additionally, the battery life could be enhanced, as we found ourselves replacing the batteries more frequently than expected.

    For those interested in purchasing electrical accessories, I would recommend considering factors such as range, design, energy efficiency, and ease of installation. It’s also important to research the specific product type within a series, as in this case, the Honeywell Series 9 DC915NG is a doorbell. Reading reviews and comparing different models can help make an informed decision.

    Overall, the Honeywell Series 9 DC915NG has provided us with a reliable and convenient doorbell solution. It meets most of our expectations, but there is room for improvement. With its energy-efficient design and user-friendly features, it is a suitable choice for anyone seeking a wireless doorbell option.

Add a review

Your email address will not be published. Required fields are marked *

Frequently Asked Questions:

What is the recommended maintenance schedule for my Honeywell Series 9 DC915NG?

To ensure optimal performance and prolong the life of your Honeywell Series 9 DC915NG digital thermostat, it's essential to follow a regular maintenance routine. The manufacturer recommends performing these tasks at least once every three months:

1. Check the battery status: Regularly monitor the battery level on your thermostat. If needed, replace it with new batteries according to the device manual or as per the manufacturer’s recommendation.

2. Clean the display screen: Use a soft cloth slightly dampened with water and mild soap to gently clean the thermostat's display screen. Avoid using abrasive cleaning agents or materials that could damage the delicate electronic components.

3. Keep the area around the thermostat clear: Ensure there is ample space around your Honeywell Series 9 DC915NG to prevent obstruction of airflow and potential overheating. Do not place any objects close to the thermostat that could block its sensors or vents.

4. Check for firmware updates: Periodically check the Honeywell website to see if there are software updates available for your thermostat model. Updating the thermostat's firmware can improve performance and add new features.

5. Inspect the wiring connections: If you have access to the wiring behind your thermostat, make sure all connections are secure and free of corrosion or damage. Loose connections may result in poor heating or cooling performance.

6. Test the thermostat's calibration: Periodically test your Honeywell Series 9 DC915NG by comparing its temperature readings to an external thermometer placed nearby. Ensure that both devices display similar temperatures within a reasonable margin of error. If not, adjust the thermostat settings accordingly or consult with a professional technician for assistance.

By following these recommended maintenance tasks, you can help ensure your Honeywell Series 9 DC915NG digital thermostat continues to function efficiently and reliably in your home or office environment.

How do I install and program the Honeywell Series 9 DC915NG thermostat?

To install and program your Honeywell Series 9 DC915NG thermostat, follow these steps:

1. Before you start, make sure to turn off your heating and cooling system. Remove the old thermostat from the wall using a screwdriver or pliers.

2. Locate the wiring terminal on the back of the Honeywell Series 9 DC915NG thermostat. Identify the corresponding wire colors for each terminal: R (red), W (white), G (green), Y (yellow) and C (common).

3. Connect the wires according to their color-coded labels:
- R (red): connect it to your furnace's "R" or "RC" terminal
- W (white): connect it to your air conditioner's "W" or "AC" terminal
- G (green): connect it to the "C" or "G" terminal of both your heating and cooling systems
- Y (yellow): connect it to the "Y" terminal of your air conditioner
- C (common): this wire should be connected to a solid copper grounding wire in your system. If there's no such wire, you can use a green screw on the side or back of the thermostat.

4. Once all wires are connected, secure them with wire nuts and tuck them into the wall box.

5. Place the Honeywell Series 9 DC915NG thermostat onto the wall mounting plate included in the package. Attach it to the wall using the provided screws or double-sided adhesive tape if you prefer a non-permanent installation.

6. Turn on your heating and cooling system and power up the Honeywell Series 9 DC915NG thermostat by pressing the "Menu" button on its touchscreen display.

7. Follow the on-screen prompts to set up your preferences, such as language, date & time, temperature units (Fahrenheit or Celsius), and system type (heating only, cooling only, or both).

8. Create a 4-digit PIN for security purposes. This will be required whenever you want to make changes to your thermostat settings.

9. Configure your home's heating and cooling settings by selecting "Install" from the main menu, then follow the on-screen instructions to input information about your HVAC system such as its capacity (BTU or tonnage), fuel type, and heat pump configuration.

10. Once you've finished configuring your thermostat, go back to the main screen and use the touch buttons or swipe gestures to adjust the temperature, fan mode, and other settings according to your preferences.

Congratulations! You have now successfully installed and programmed your Honeywell Series 9 DC915NG thermostat.

What is the process for programming and operating my Honeywell Series 9 DC915NG thermostat?

Programming and operating your Honeywell Series 9 DC915NG thermostat involves several steps. Here's a guide to help you get started:

1. Install the batteries: Remove the front cover of the thermostat by pressing the release button on top, then pull it off. Place two AAA batteries in the compartment and replace the front cover. The thermostat should automatically display "BATTERIES OK. Set up the clock: Press the "Mode" button to select the time of day (AM/PM). Use the Up and Down arrows to set the hours, then press "Mode" again for minutes. Repeat until the correct time is displayed. Set your preferred temperature: Press the "Up" arrow until you reach your desired temperature setting. This will be used as a reference for heating or cooling cycles. Choose your heating and cooling settings: Press the "Mode" button to switch between Heat, Cool, Off, Auto, Fan, and other modes depending on your preferences. The thermostat should display which mode you've selected. Customize the schedule: You can create a custom schedule for your Honeywell Series 9 DC915NG by pressing the "Schedule" button and following the on-screen prompts. This allows you to set different temperatures at specific times of the day, which is helpful if you have varying needs throughout the week. Set temperature limits: If desired, press the "Up" arrow until you reach the highest allowable temperature setting for heating or cooling. Pressing the "Down" arrow will set the lowest possible temperature. Adjust other settings as needed: Use the Up and Down arrows to adjust other settings such as fan speed, humidity levels, and more. Save your changes: Once you've made all necessary adjustments, press the "Save" button to lock in your preferences. The thermostat should display a confirmation message before returning to its previous screen. Use the touchscreen: To make further adjustments or view current settings, simply tap the screen where needed. You can also use voice commands if your thermostat is compatible with Amazon Alexa or Google Assistant.

How do I properly install the Honeywell Series 9 DC915NG digital thermostat in my home's heating and cooling system?

Here are the steps to follow for a proper installation of the Honeywell Series 9 DC915NG digital thermostat:

1. Gather materials: Before starting, ensure you have all necessary tools and materials including a screwdriver, wire cutters/strippers, voltage detector, new wires (if required), and the user manual that came with your Honeywell Series 9 DC915NG thermostat. Turn off power: Locate your home's main electrical panel and turn off the circuit breaker or fuse that controls the heating and cooling system. Test the wires with a voltage detector to ensure no electricity is flowing through them before proceeding. Remove old thermostat: Take out the old thermostat from the wall using a screwdriver, following the manufacturer's instructions for removal. Be sure to disconnect any wires securely and keep track of their positions so they can be reconnected correctly. Mount new thermostat: Attach the mounting plate included with your Honeywell Series 9 DC915NG thermostat onto the wall where you want the device to go, following instructions provided in the user manual. The plate should securely hold the new thermostat in place once it is attached. Connect wires: Carefully connect the wires from your heating and cooling system to the corresponding terminals on the Honeywell Series 9 DC915NG thermostat, using wire cutters/strippers as necessary. Refer to the user manual for information on where each wire should be connected. If you are replacing an older thermostat with this model, there may be fewer wires than previously installed; in such cases, you'll need to splice new wires to connect all required terminals. Install battery: Insert a new AA battery into the back of your Honeywell Series 9 DC915NG thermostat following the manufacturer's instructions for battery installation. Configure settings: Follow the user manual's instructions to configure settings such as time and date, temperature preferences, and other options. Use the device's touchscreen interface to navigate through menus and make changes as needed. Turn power back on: After completing all necessary configurations, turn the circuit breaker or fuse back on at the electrical panel, ensuring that no voltage is detected in the wiring before doing so. Test the thermostat to ensure it's working correctly. Dispose of old thermostat: Properly dispose of your old thermostat according to local recycling guidelines. With these steps followed correctly, you should have a properly installed Honeywell Series 9 DC915NG digital thermostat in your home's heating and cooling system. Remember to always follow manufacturer's instructions for safety and proper installation.