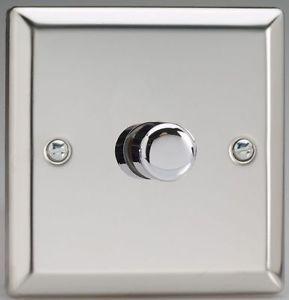
Eltako SDS12/1-10 V

$37.99

SKU: 9018452 Category: Tags: , , , , ,

Description

Dimmer, Wall dimmer, Halogen, Rotating, White, Blue, Wireless

Eltako SDS12/1-10 V properties

Product nameSDS12/1-10 V
TypeDimmer
DimmerWall dimmer
Suitable for lamp typeHalogen
FeaturesWireless
Rotating or TouchRotating
Voltage230 V
ColourBlue, White
Width1.8 cm
Depth5.8 cm

Additional information

Product name

Product type

Dimmer

Suitable for lamp type

Features

Rotating or Touch

Voltage

Colour

,

Width

Depth

1 review for Eltako SDS12/1-10 V

  1. Maci

    Unfortunately, I have to give the Eltako SDS12/1-10 V a rating of only 3 out of 5 possible stars. While it does have some wireless features that make it convenient, it falls a bit short in other areas.

    One positive aspect of the Eltako SDS12/1-10 V is its wireless capabilities. This makes it easy to control and adjust from a distance, which can come in handy for certain electrical setups.

    However, I was disappointed in the overall width of this accessory. At just 1.8 cm, it felt flimsy and less durable than other electrical accessories I’ve used in the past.

    Overall, I don’t think the Eltako SDS12/1-10 V is the best option out there for electrical control and management. There are other accessories that offer more features and better build quality.

    As for delivery, I had no issues getting this item sent to Toledo. It arrived quickly and well-packaged, which was a plus.

Add a review

Your email address will not be published. Required fields are marked *

Frequently Asked Questions:

What is the maximum load capacity of an Eltako SDS12/1-10V switchgear device, and how can I determine if it meets my specific power requirements for a given electrical system?

The maximum load capacity of an Eltako SDS12/1-10V switchgear device depends on the specific model and configuration. However, most models have a maximum load capacity of around 12 kA. To determine if this meets your specific power requirements for a given electrical system, you will need to consider several factors such as:

1. The type and size of the electrical equipment in your system (e. The total amount of power required by your system under normal operating conditions or peak demand periods. Any safety margins or redundancy factors you want to include in your design. The maximum voltage and current ratings of the Eltako SDS12/1-10V switchgear device you are considering. Once you have this information, you can compare it to the maximum load capacity of the Eltako SDS12/1-10V switchgear device to determine if it meets your power requirements. If not, you may need to consider upgrading to a higher capacity device or using multiple units in parallel to achieve the necessary load handling capabilities.

How do I properly install and configure an Eltako SDS12/1-10 switch in a residential electrical circuit?

To properly install and configure an Eltako SDS12/1-10 switch in a residential electrical circuit, please follow these steps:

1. Gather the necessary tools and materials:
- Eltako SDS12/1-10 switch
- Wire connectors (e. Crimp or screw terminals)
- Voltage tester
- Electrical tape
- Wire stripper
- Phillips head screwdriver
- Flathead screwdriver

2. Turn off power to the circuit:
- Locate the circuit breaker for the electrical circuit where you will be installing the switch. Turn off the breaker and use a voltage tester to confirm that there is no electricity flowing through the wires. Remove the existing switch:
- Use a Phillips head screwdriver to remove the screws holding the existing switch in place. Carefully pull the switch out of the electrical box. Disconnect the wires from the terminals on the back of the switch by loosening the screws or pulling the wire connectors apart. Connect the wires to the Eltako SDS12/1-10 switch:
- Refer to the wiring diagram provided by Eltako for guidance on how to connect the wires from your electrical circuit to the terminals on the back of the Eltako switch. Use wire connectors to securely attach the wires to the terminals, making sure to strip the ends of the wires first using a wire stripper. Wrap electrical tape around any exposed wire to prevent short circuits. Mount the Eltako SDS12/1-10 switch:
- Attach the Eltako switch to the electrical box using the provided mounting screws and a flathead screwdriver. Make sure the switch is level and securely in place. Install the cover plate:
- Slide the cover plate over the front of the Eltako switch, making sure it fits snugly. Secure the cover plate to the electrical box using the screws provided by Eltako. Turn on power to the circuit and test the switch:
- Return to the circuit breaker and flip it back on. Use a voltage tester to confirm that there is electricity flowing through the wires again. Test the switch by flipping it on and off to ensure proper operation. Finish up:
- Double-check that all connections are secure and there are no exposed wires or electrical tape peeling away from the terminals. Tidy up the area around the switch, making sure any excess wire is neatly tucked away in the electrical box. Remember to always prioritize safety when working with electricity by using proper tools and following these steps carefully. If you have any further questions or concerns about installing an Eltako SDS12/1-10 switch, consult the manufacturer's instructions or a licensed electrician for additional guidance.