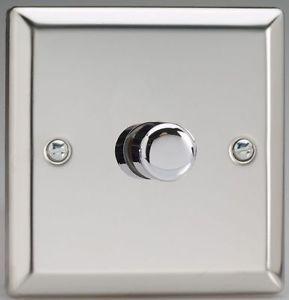
Berker 2873

(1 customer review)

$46.99

Description

Dimmer, Wall dimmer, Indoor, Led, Halogen, Incandescent, Rotating, Touch

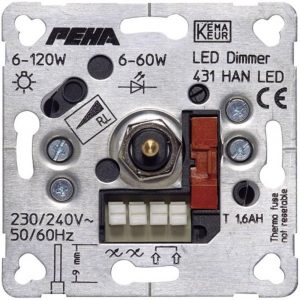
Berker 2873 properties

Product name2873
TypeDimmer
DimmerWall dimmer
Suitable for lamp typeHalogen, Incandescent, Led
Area of UseIndoor
Max load Incandescent500 W
Min load Incandescent20 W
Max Load Led100 W
Min Load Led3 W
Max Load halogen500 W
Min Load halogen20 W
Rotating or TouchRotating, Touch
Voltage230 V

Additional information

Product name

Product type

Dimmer

Suitable for lamp type

, ,

Area of Use

Max load Incandescent

Min load Incandescent

Max Load Led

Min Load Led

Max Load halogen

Min Load halogen

Rotating or Touch

,

Voltage

1 review for Berker 2873

  1. Penelope Shaw

    As someone who relies on lighting to create a comfortable and productive work environment, I was excited to try out the Berker 2873 dimmer switch. Unfortunately, I can only rate it at two out of five stars.

    My experience with this switch has been frustrating. Firstly, the installation process was difficult and time-consuming, requiring the help of an electrician. Second, the switch itself is confusing to use and doesn’t work consistently with different LED bulbs. Even with the 3 W min load LED, I find it difficult to achieve the desired level of brightness. Finally, the switch feels cheaply made and not durable.

    In comparison, I have had much better luck with the Lutron Maestro C.L dimmer switch. This switch is compatible with a wider variety of bulbs and is much easier to install. Plus, it is more aesthetically pleasing and feels more solidly constructed.

    As for the delivery of the Berker 2873 to Laredo, it was a bit of a story. I initially went to a local hardware store to purchase a dimmer switch, but they didn’t have any in stock that worked with LED bulbs. After a quick Amazon search, I settled on the Berker 2873. Unfortunately, it took almost two weeks to arrive, which left me with a poorly lit workspace for far too long.

    Overall, I cannot recommend the Berker 2873 dimmer switch. Its confusing operation and weak compatibility make it not worth the trouble.

Add a review

Your email address will not be published. Required fields are marked *

Frequently Asked Questions:

How do I install a Berker 2873 switch and what are its compatibility requirements with other electrical components?

To install a Berker 2873 switch, follow these steps:
1. Turn off the power supply to the area where you plan to install the switch at your main fuse box or circuit breaker panel.
2. Locate a suitable junction box near the area where you want to install the switch. If no existing junction box is present, you'll need to install one.
3. Connect all wires from the existing fixtures and switches to the new junction box, ensuring that each wire has enough slack for easy disconnection in the future.
4. Remove the cover plate of the junction box and mount the Berker 2873 switch according to the manufacturer's instructions.
5. Connect the live (usually red) wire from the power supply to the L terminal on the back of the Berker 2873 switch.
6. Connect the neutral (usually blue or black with a yellow stripe) wire from the power supply to the N terminal on the back of the Berker 2873 switch.
7. If your installation requires a load connection, connect the load wire (usually brown) to the appropriate terminal on the back of the Berker 2873 switch.
8. Screw the cover plate back onto the junction box and turn on the power supply at your main fuse box or circuit breaker panel.
Regarding compatibility requirements with other electrical components, a Berker 2873 switch is designed to work with standard household voltage systems (110-120V for North America) and can be used with other electrical components such as lights, outlets, and fans that operate within this voltage range. However, it's essential to ensure that all electrical components in your installation are compatible with the switch and each other, including proper amperage ratings and wiring configurations.

How do I properly install and wire a Berker 2873 switch in my electrical circuit?

Turn off the power to the electrical circuit you will be working on by flipping the appropriate circuit breaker or removing the fuse from the main electrical panel. This is an essential safety measure to prevent electric shock and injury. Remove the existing switch from the electrical box using a screwdriver. Make note of the wiring connections, as you will need to reconnect them in the same way when installing the new Berker 2873 switch. Prepare the electrical box by cleaning out any debris or loose material. If the electrical box is made of metal, use a wire nut to wrap the black ground wire from the electrical cable around the green ground screw on the back of the electrical box. This will ensure that the electrical circuit is properly grounded. Connect the wires from the Berker 2873 switch to the corresponding wires in the electrical box. Typically, there are three wires: a black wire (hot), a white wire (neutral), and a green or bare copper wire (ground). Connect the black hot wire from the electrical cable to the black terminal screw on the switch labeled "L". Connect the white neutral wire to the silver-colored terminal screw on the switch labeled "N". If there is a ground wire, connect it to the green terminal screw on the switch labeled "PE". Securely fasten the Berker 2873 switch to the electrical box using the provided mounting screws. Be sure to tighten the screws firmly, but do not overtighten them as this could cause damage to the switch. Attach the cover plate over the switch, ensuring that it is properly aligned and securely fastened to the wall. Turn the power back on at the circuit breaker or by replacing the fuse in the electrical panel. Test the Berker 2873 switch to ensure that it is functioning correctly. If there are any issues with the installation, turn off the power and consult the manufacturer's instructions or a licensed electrician for assistance. Remember, always prioritize safety when working with electricity and follow all local electrical codes and requirements.