Berker 286210

£48.12

Description

Dimmer, Universal Dimmer, Led, Halogen, Incandescent, Rotating, IP 20, Grey

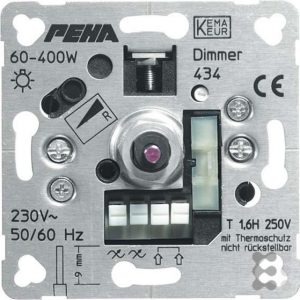
Berker 286210 properties

Product name286210
TypeDimmer
DimmerUniversal Dimmer
Suitable for lamp typeHalogen, Incandescent, Led
Rotating or TouchRotating
Voltage230 V
IP ClassificationIP 20
ColourGrey
Height7.1 cm
Width7.1 cm
Depth5.0 cm

Additional information

Product name

Product type

Dimmer

Suitable for lamp type

, ,

Rotating or Touch

Voltage

IP Classification

Colour

Height

Width

Depth

1 review for Berker 286210

  1. Colin

    I recently purchased the Berker 286210 Electrical Accessory in March for my home in Irvine. I would rate it 3 out of 5 possible stars. Although it provided the necessary function, it wasn’t the best in terms of quality and design aspect.

    One of the good features about this accessory is its IP 20 IP Classification which keeps it protected against dust and objects bigger than 12.5mm. Also, with a width of 7.1cm, it fits perfectly without taking too much space.

    However, compared to other Electrical Accessories in the market, I found Berker 286210 not up to my expectations, mainly regarding its durability and the aesthetics. I have used other brands which were more durable and visually appealing.

    Regarding delivery, I didn’t face any issues as it reached me on time without any damage. However, I would have appreciated more updates about the delivery process.

    Overall, Berker 286210 provides the basic function, but other brands in the market provide better quality and design options at a similar price range.

Add a review

Your email address will not be published. Required fields are marked *

Frequently Asked Questions:

What is the compatibility of Berker 286210 switch with other brands of electrical accessories?

The Berker 286210 switch is specifically designed to be used in conjunction with other Berker products, as it features a modular design that allows for seamless integration. It is unlikely to be compatible with other brands of electrical accessories, as the connections and dimensions may not match up properly.

However, if you have specific questions about compatibility with particular brands or products, I'd recommend reaching out directly to Berker customer support or consulting with a certified electrician who can advise based on your specific installation needs.

"How do I replace the bulb in a Berker 286210 switch?"

To replace the bulb in a Berker 286210 switch, follow these steps:

1. Turn off power to the switch at the circuit breaker or fuse box. Remove the switch plate by gently pulling it down and away from the wall. Locate the bulb socket inside the switch. It is usually located in the center of the switch face, covered by a small plastic lens. Gently pull the lens off the socket to reveal the bulb. Twist the bulb counterclockwise to remove it from the socket. Insert your new bulb into the socket, ensuring that it is properly aligned and pushed all the way in. Replace the lens over the socket, making sure it is securely attached. Push the switch plate back into place, aligning the screws with the holes on the wall. Tighten the screws to hold the switch plate firmly in place. Turn the power back on at the circuit breaker or fuse box and test the new bulb. Congratulations! You have successfully replaced the bulb in your Berker 286210 switch. If you encounter any difficulties, consult the manufacturer's instructions for further guidance.

Question: How do I properly install the Berker 286210 in my electrical outlet?

To properly install the Berker 286210, follow these steps:

1. Ensure that there is no power supply to the electrical outlet where you will be installing the switch. For safety reasons, turn off the main power switch of your home or building before proceeding with any electrical work. Remove the faceplate from the electrical outlet by gently prying it off with a flat-head screwdriver or a similar tool. Be careful not to damage the outlet's wiring or other components in the process. Locate the switch terminals on the back of the outlet. These are typically labeled "L" (line) and "N" (neutral). The L terminal is connected to the power source, while the N terminal is connected to the ground. If you're unsure which terminal is which, consult your home's electrical wiring diagram or a professional electrician. Cut off any excess wire from the Berker 286210 using wire cutters or a similar tool. Strip about 1/2 inch of insulation from the ends of both wires using a stripping tool or a knife. Be careful not to touch the exposed copper wiring with your bare hands, as it may cause electrical shock. Twist together the black wire (usually labeled "L1" on the Berker 286210) with the L terminal of the outlet using a wire connector or by twisting them tightly together by hand. Do the same for the white wire (usually labeled "N") with the N terminal. Secure the wires to the terminals using electrical tape or a wire nut. Make sure that there are no loose connections and that the wiring is neat and tidy. Reattach the faceplate to the outlet, making sure it fits snugly over the switch. Turn on the main power switch of your home or building and test the installation by flipping the Berker 286210 switch on and off. If everything works correctly, you've successfully installed the switch in your electrical outlet.

How do I properly install and wire Berker 286210 switches in my home electrical system?

Here's a general guide on how to install and wire Berker 286210 switches:

1. Turn off power: Before starting any electrical work, make sure the power is turned off at the circuit breaker or fuse box. Use a voltage tester to confirm that there is no electricity flowing through the wires you'll be working on. Remove the old switch: Use a screwdriver to remove the cover plate and unscrew the mounting screws holding the old switch in place. Gently pull the switch out of the wall. Note the position of the wires (usually black, white, and green) and the type of connection used (either wire nuts or terminal screws). Prepare the Berker 286210 switch: Open the packaging and check that all parts are present. The Berker 286210 switch comes with a pre-wired module that should be inserted into the rear of the switch. Follow the manufacturer's instructions to ensure proper installation of this module. Connect the wires: Consult the wiring diagram provided by Berker for your specific application. The connections will vary based on the type of circuit you have (single-pole, three-way, or four-way). Use wire nuts or terminal screws to connect the wires according to the diagram. Make sure all connections are secure and properly insulated with wire nuts or electrical tape. Install the switch: Carefully insert the Berker 286210 switch into the wall box, making sure the pre-wired module is oriented correctly. Secure the switch in place using the mounting screws provided. Attach the cover plate to conceal the switch. Test the circuit: Turn the power back on at the circuit breaker or fuse box. Use a multimeter to verify that the wiring is correct and that voltage is flowing through the new Berker 286210 switch. If everything is working properly, you can use the switch as normal. Remember, it's always best to consult a licensed electrician if you're unsure about any aspect of electrical work or have complex wiring requirements.