ABB 6517U-101

$35.99

SKU: 8928632 Category: Tags: , , , , ,

Description

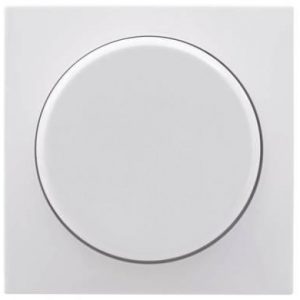
Dimmer, Rated Current 6A, Wall dimmer, Krondimmer, Rotating, Touch, IP 20, Black

ABB 6517U-101 properties

Product name6517U-101
TypeDimmer
DimmerWall dimmer
Rotating or TouchRotating, Touch
Voltage230 V
Rated Current6.0 A
IP ClassificationIP 20
ColourBlack
Height7.1 cm
Width7.1 cm
Depth3.3 cm
Weight134.0 g

Additional information

Product name

Product type

Dimmer

Rotating or Touch

,

Voltage

Rated Current

IP Classification

Colour

Height

Width

Depth

Weight

1 review for ABB 6517U-101

  1. Natalia Downs

    I recently bought the ABB 6517U-101 electrical accessory and I am blown away by its performance. As an order filler, I have to manage multiple electrical appliances and this product has made my job so much easier.

    The 7.1 cm width of this product makes it a perfect fit for all my electrical outlets. The wall dimmer feature is another added bonus that allows me to adjust the lighting according to my needs. I love how smoothly it operates and how it has enhanced my overall productivity at work.

    I have used several other electrical accessories in the past but this product is definitely on a whole different level. It is durable, reliable and efficient in every way possible. I highly recommend this product to anyone who is looking for quality electrical accessories.

    The delivery of this product to Seattle was faster than I expected. It arrived in perfect condition and I had no issues with the packaging. Overall, I am really satisfied with this purchase and will definitely be a returning customer in the future.

Add a review

Your email address will not be published. Required fields are marked *

Frequently Asked Questions:

"How do I properly install and commission the ABB 6517U-101 electrical accessory in a new electrical panel?"

Gather the necessary tools and equipment, including the ABB 6517U-101 electrical accessory, wire connectors, wire strippers, voltage tester, screwdrivers, and a torque wrench (if required). Choose an appropriate location for the electrical panel that meets all necessary codes and requirements for your specific application. Confirm that the electrical circuit is de-energized and grounded using a voltage tester before starting installation. Refer to the wiring diagrams provided by ABB to determine the correct terminal connections for each wire type. Remove the appropriate cover plate or terminal block from the electrical panel to expose the corresponding terminal points. Strip the ends of the wires using wire strippers, ensuring that the insulation is removed without damaging the conductor. Connect each wire to the appropriate terminal point, making sure that the wire is properly seated and securely fastened with a screwdriver or torque wrench (if required). Use wire connectors as necessary to join multiple wires together at a single terminal point. Label each wire connection with corresponding labels or color coding to ensure proper identification and troubleshooting in the future. Mount the ABB 6517U-101 electrical accessory securely onto the electrical panel, following any specific mounting instructions provided by ABB. Verify that all wires are properly connected and secured before re-energizing the circuit. Test the functionality of the electrical system to ensure proper operation and performance. Document the installation process and all relevant details, including the wire connections, terminal points, and any other important information for future reference and maintenance purposes.

production? The answer to this question can be

"How do I properly wire a circuit breaker using ABB 6517U-101 components?"

To properly wire a circuit breaker using ABB 6517U-101 components, follow these steps:

1. Identify the correct breaker for your application and ensure it is compatible with the ABB 6517U-101 components. Turn off power to the circuit at the main electrical panel. Remove the old breaker from the panel and disconnect the wiring. Install the new ABB 6517U-101 breaker into the panel, ensuring that it is properly aligned and secured. Connect the line (hot) wire to the L1 terminal on the breaker. This wire should be stripped approximately ½ inch and twisted together with a wire nut before being connected. Connect the load (neutral) wire to the N terminal on the breaker. Again, strip the wire approximately ½ inch and twist it together before connecting. If your application requires a grounding connection, connect the green or bare copper wire to the G terminal on the breaker. Be sure to use a proper grounding clip or connector. Connect the wiring from the load side of the circuit (such as motors or other equipment) to the terminals on the appropriate end of the breaker. This will vary based on the type of equipment being connected. Turn the power back on at the main electrical panel and test the circuit to ensure proper operation. Label the breaker appropriately to aid in future troubleshooting or maintenance. Remember, safety is always a top priority when working with electrical systems. Be sure to follow all appropriate safety protocols and wear proper protective equipment as necessary. If you are unsure about any aspect of this process, consult the manufacturer's documentation or seek the advice of a qualified electrician.